Removing Swirl Marks and Scratches
Any discussion on removing swirl marks and scratches remains a frustrating
display of just how much confusion still exists in this industry.
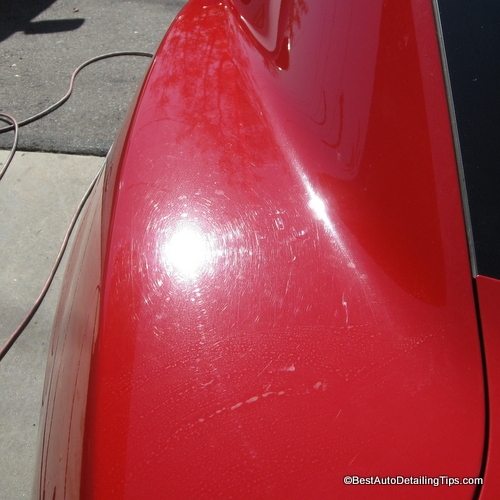
"Hey Darren, I heard you should never apply wax or polish in a circular pattern because this will cause swirl marks!"
This is claim that can be seen and heard in the ever-growing group of what I call "detail hacks" that can be found on YouTube.
Swirl marks are NOT caused by applying products in a circular pattern!
This is simply bad information that appears to be sound thinking, but is really just false information. What any of us were taught if we watched the iconic movie "Karate Kid", was in fact, appropriate. Wax on, wax off!
What are Swirl Marks:
Bad information, repeated by misinformed people
The problem is also compounded by the fact that the term swirl mark carries no definitive definition among car owners and experts alike, so this term is often used when trying to identify certain problems when it comes to clear coat or car paint (two additional areas that carry massive amounts of confusion), but used in a variety of ways, to label a variety of problems.
There just simply seems to be no consistent definition of terms. If none of us can agree on what we are talking about, then how are we to reach conclusions as to proper strategies moving forward.
- What are swirl marks?
- What are cobwebs or spider webbing on car paint?
- What are car paint scratches?
- Can swirl marks and scratches be fixed?
These along with other questions will be answered as go into a deeper understanding of some of the common problems to removing swirls marks and scratches from car paint.
Removing Swirl Marks and Scratches:
What you need to know
What you need to know and accept first and foremost is that the world of cosmetic car care, like virtually every other topic of life, is an industry with massive amounts of hype and self-promotion.
Very few industry leaders or manufacturers themselves are interested in educating you as a car owner.
If only we could standardize the terminology within this industry so we all started at common ground before debating products, techniques, or tools!
Any discussion on removing swirl marks and paint scratches will prove complicated enough without adding the additional task of debating the definition of terms within this industry.
But that is a reality we must face.
What are Swirl Marks?
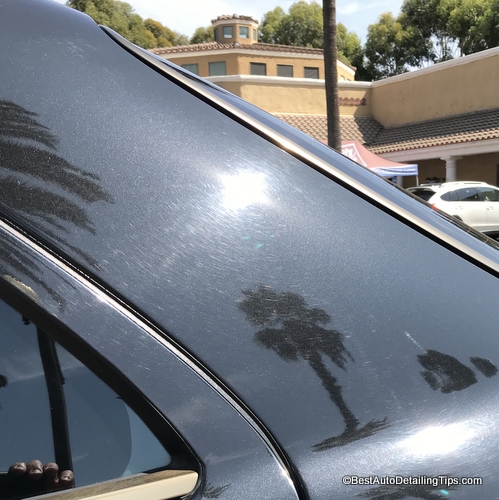
In the most basic and common applications, swirl marks are the overall appearance to the paint of your car that is caused by the reflection of light from the thousands of micro-scratches that are present on your car paint.
T repeat myself from the introduction, the biggest problem is no common accepted use of the label: swirl marks.
People use this term to identify and describe a variety of car paint problems.
This affect is also commonly referred to as cob-webbing or spider-webbing to car paint. This affect is produced as light reflects from the thousands of micro-scratches that can be found on virtually every car in varying degrees.
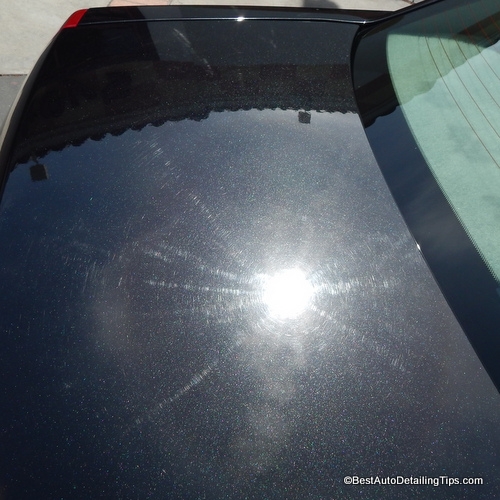 Classic "spider webbing" or "cobwebbing" effect on the trunk of this black Mercedes when viewed in direct sunlight
The term "swirl" is a result of these micro-scratches appearing as a circular pattern in the paint. This pattern is literally caused by the reflections of the individual scratches themselves, and the light source being circular in shape.
But to confuse a term that finds itself already suffering from an identity crises, is the fact that these micro-scratches only appear in a true circular pattern as a result of the light source being round in shape - the most common example being that of the sun - otherwise this pattern of cob-webbing effect would not appear circular in shape at all.
Try viewing any car using artificial lighting from a source that is not circular in shape - like rectangular fluorescent lighting or a square LED light - and you will observe the absence of this circular or swirled effect.
What Causes Swirl Marks?
Swirl marks is simply another name for the thousands of micro-scratches that have been put into your clear coat as a natural byproduct of traditional car washing, car drying, and even waxing your car.
Anytime you touch your car to wipe, rub, or apply, you will run the risk of putting more and more of these micro-scratches into the clear coat surface.
Despite the endless claims put out by the countless so-called experts and YouTube Hacks, swirl marks are not a result of applying wax or polish in a circular pattern.
This worn out advice of the YouTube hacks to never polish or apply car wax in a circular pattern is simply false.
Any actual and discernible circular pattern created by polishing or waxing in a circular manner would be a direct result of scratching the paint with a very harsh applicator pad or cloth, or very aggressive compounds.
This specific affect should not be confused by the swirled appearance produced by thousands upon thousands of micro-scratches that true industry experts would rightfully label as cob-webbing or spider-webbing.
Are Swirl Marks Fact or Fiction?
Fact.
This pattern will be revealed on virtually every car when viewed in direct sunlight.
The problem is more about improper use of the term swirl marks. It is common practice for the inexperienced car owner when observing their car paint in direct sunlight, to label this basic and natural appearance as swirl marks.
This swirled or circular pattern of the scratches naturally present on any car paint surface is a direct result of the sun being round in shape. If the sun were any other shape, this swirled or circular pattern would not be created.
The added confusion develops when you view the surface of your paint using some form of artificial lighting that is not concentrated or focused from a round light source.
Examples of this would be rectangular overhead fluorescent lights, or a square LED light. When viewing the paint surface of a car under these conditions it will not reveal a swirled, radial, or circular pattern.
What are Car Paint Holograms?
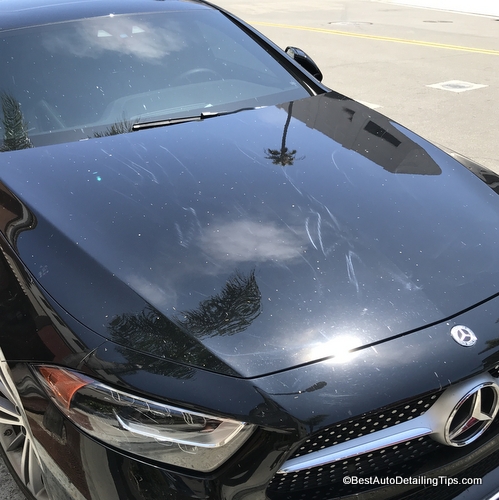
In simplest of terms, holograms or hologramming is an effect resembling reflective patterns of light that appear to "float" just above the actual surface of car paint.
As you change viewing perspective, the hologram pattern also appears to move as they "float" across the surface of the car paint in direct relation to how you change viewing perspectives.
You could relate this appearance of the individual hologram trails to vapor trails produce by airplanes, or cloud trails in the sky.
Most often these hologram trails will form a grid pattern as a result of the pattern typically used by a person as they polish section to section of a car while using a rotary polisher.
What Causes Holograms in Car Paint?
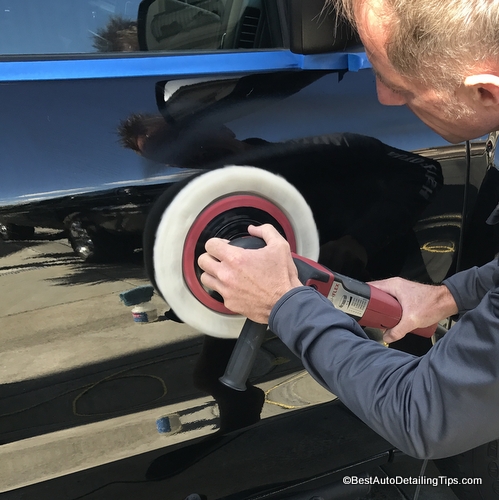
Holograms in car paint are a direct result of improper use of a rotary (high-speed) machine car polisher. Unlike dual-action car buffers that move/spin in two distinct movements, rotary car buffers spin at just a single axis point.
Holograms like the ones pictured on the hood of this black Mercedes, are unique to the single spinning action of a rotary car buffer.
Unlike
swirl marks that are created over time, holograms are a direct result
of a specific moment.
Difference Between Car Paint Scratches and Swirl Marks
If you have been following along, you may have a pretty good idea as to why I am listing this question with regards to removing swirl marks and scratches.
The term "scratches" is a very loaded statement due to the fact that virtually every person you ask would deliver a different response as to what exactly is a car paint scratch.
Are you talking about specific scratches found randomly on your car, or an overall appearance to your car paint that looks as though the entire surface of your paint is made up of countless micro-scratches.
It is hard to adopt a strategy for removing swirl marks and scratches if you are unable to identify what is actually going on with your car. Most car owners simply do not know how to look at car paint and properly judge and identify exactly what is going on.
Often a person will use terms they don't fully understand, along with generalized terms in an effort at describing an unwanted affect that they have hopes in fixing. Hence the commonly used term of removing swirl marks and scratches from a car.
For the context of this page on removing swirl marks and scratches, I am referring to the unwanted affect of your overall paint that is more accurately labeled as cob-webbing or spider-webbing affect.
If you have specific car paint scratches, but find that the overall condition of your car paint is acceptable, then you can go to my car paint scratch repair page.
Removing Swirl Marks and Scratches
Now we come to the million dollar question of removing swirl marks and scratches. There is a very simple explanation of how to do this that you might find shocking as a car owner:
"To permanently remove swirl marks and paint scratches you need to scratch your way to success."
When it comes to removing swirl marks and scratches as part of an overall affect of your car paint, the best way to remove these uninvited swirl marks and scratches is through machine polishing of your car paint.
In simple terms the goal of this page is about the best way of removing swirl marks and scratches that we have identified as an overall unwanted appearance to your car's paint.
Paint Enhancement Versus Paint Correction
When it comes to removing swirl marks and scratches in car paint, you have two basic choices as your starting point. Each possibility will require different "tools" and different products.
- Temporary (referred to as Paint Enhancement)
- Permanent (referred to as Paint Correction)
Temporary: If you are looking for the simplest, easiest way to fix swirl marks and scratches you can default to your choice in what you may consider as the best car wax or paint sealant.
Both these types of products will naturally conceal and hide paint defects. But with that said, each situation will be unique and there is no car wax or paint sealant that has the ability to hide or conceal every type of paint defect, blemish, swirl mark, or scratch.
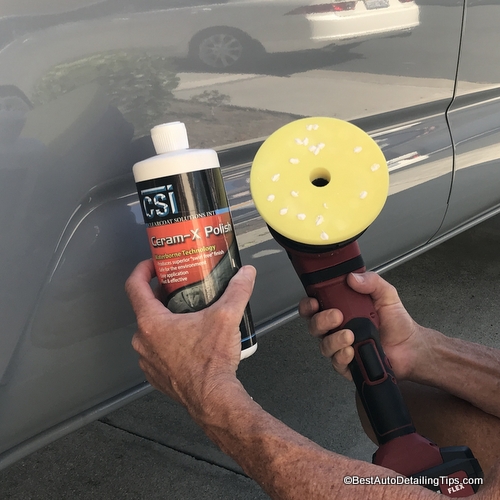
Because of these limitations of car waxes and sealants, these simply represent a temporary "improvement" to a problem that requires different technology to deliver lasting results.
Permanent: If you are looking to realize permanent results, you will need abrasives in the form of a compound or polish. The good news is that the industry now offers a single product that can perform the heavy duty compounding and finish to a swirl free finish.
3D One:
- One polish to perform the heavy cutting and finishes down to a swirl free finish
- You control the aggressiveness through your polishing pad choice, buffer type, buffer speed, pressure you apply while polishing, etc.
- Makes your life simpler with the ability to use a single polish for all your polishing needs
- Can be used on any paint type, any paint color
One of the biggest challenges you will face as you go about removing swirl marks and scratches through machine polishing will be the endless debate as to which is the best car polish to use.
For me that has always been about finding the best balance between a compound that can do heavy lifting, and a polish that can do the fine tuning.
The industry would have you believe that you need separate and dedicated compounds and polishes that range in their aggressiveness. This strategy is based on the same strategy as using different grits of sand paper when sanding away unwanted blemishes and defects in the material you are working on (wood, paint, metal, etc.)
But this strategy is outdated. No longer do you need multiple products in the form of compounds and polishes to perform any type of paint correction, or specifically in this case, removing swirl marks and scratches.
This is where the age of a product like the one above will make your life easier, better, and less complicated. Now you can perform all stages of paint correction and/or defect removal with the use of a single polish.
A single product that has the ability to perform
heavy defect removal (swirl marks/scratches/etc.) and finish to a swirl
free finish (or more accurately, a hologram free finish).
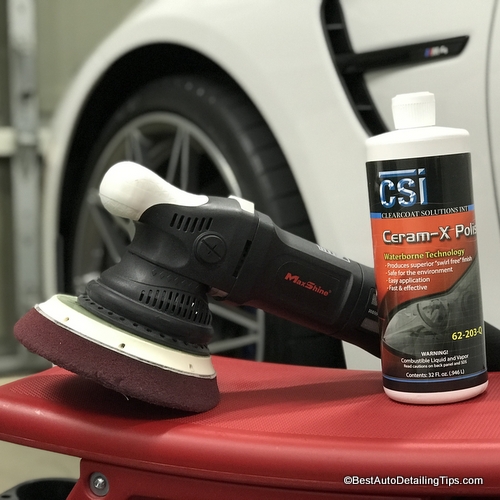 Here is another examples of a single product that can perform the heavy lifting and finish to a swirl free finish.
Removing Swirl Marks and Scratches:
Tools required
For true paint correction of swirl marks and scratches in your paint, you will need the following:
- Machine polisher
- Car polish
- Polishing pads
- Micro-fiber cloths
Darren's Note: While you may be one of those people who have been frightened away by the used-up advice from so-called experts on YouTube, the reality is that by using the right type of machine polisher (more on that as follows) you can achieve professional results right out of the gate as a true beginner.
If you think you are able to achieve the same results by polishing your car by hand as you would with a machine polisher, you are in for a yet another disappointment in life. Your hand will never replicate the speed, duration, and consistent action of a machine polisher.
Car Buffer
- Professional grade car polisher
- 15 mm throw
- When you are ready to get serious
Darren's Note: There are endless car buffers to choose from (buffers and polishers are the same thing. Some companies call it a buffer, some call it a polisher) and you could spend an entire week searching and reviewing the "best car buffer" and find yourself stuck getting no closer to your real goals.
I prefer this over many other buffers as it represent the winning balance of cost and features. It is easy to over-pay for some of the other hyped-up buffers with social clout, but as a beginner you don't have to over-think it at the beginning.
Just know moving forward that many guys consider buffers as more toys to buy, and will continue to buy more and more of these toys regardless of use.
This is me saying that I want you to begin polishing sooner, not later.
Buffing Pads
Lake Country 5.5" x .875" CCS Cutback DA Polishing Kit (Orange, White, Black)
- Perfect buffing pad kit for beginners
- 3 pads (soft, medium, firm)
- Made for any 5" baking plate (hook and loop)
Darren's Note: The pads are perfect for anyone, but I choose them for beginners as it allows you as a beginner to choose the pad density you are most comfortable with.
The firmest pad is the one I recommend for anyone as it will provide the most working action. I realize you may be exceptionally fearful at the beginning, but the pad density is not going to make you any less safe, so you might as well get the best results from the start.
And by "best results", I mean providing the aggressiveness you need to actually put the abrasives in the polish I recommend to work in removing swirl marks and scratches.
The softer pads will still work, but will require more polishing time to produce the lasting results you want. You can always follow up with the softest pad to perform what people refer to as "jeweling" the paint.
Polishing Pad Cleaning Brush
- You will need some kind of pad cleaning tool
- Can be used on any foam or micro-fiber polishing pads
- Hold against pad face while polisher is turned on
Darren's Note: You will need to keep your pad clean from polish residue as you are working. I typically use this about every 3-4 times I apply polish to the pass as I am working.
As you continue to apply more polish as you work from section to section on your car, the old polish will accumulate on the pad. While you may think that the more polish that builds up, the less polish you will use moving forward, this is not the case.
You need to keep the pad fresh with consistent cleanings during use, so that you are working with fresh polish rather than "wadded-up" polish.
Simply hold this against the polishing pad while the buffer is on ( I usually hold polisher against one leg for leverage, and then hold the brush against the pad while it is moving to release dried and spent polish).
Removing Swirl Marks and Scratches
Now that you have the equipment, tools, and polish, it is time to start removing swirl marks and scratches. But before you actually attempt to polish your car to do this, I need to help you manage your expectations.
If you are a beginner, this is all going to be so new to you that when it comes down to taking a polisher to your car, the questions and concerns will keep coming:
- How much polish do I use?
- What speed setting do I set my buffer to?
- How much pressure to I apply to the buffer?
- How long do I polish a specific section?
These, along with many more questions will be natural for any beginner who is attempting to polish their car for the first time with the direct goal of removing swirl marks and scratches.
I will break this down simplistic possible to help you get started sooner rather than later. I will also add that as a warning, it is next to impossible to fully prepare and educate a person on a task within the 3 dimensional world, through 2 dimensional text found on this or any other website.
But here we go:
- Pre-wash your car
- Use detailing clay to remove all bonded paint contaminants (this will give you a much better polishing experience as well as a very needed step for the health of your car's paint)
- Work with your car in a shaded area
- Attach backing plate if it is not already attached (the above polisher will come with a 5" backing plate)
- Attach polishing pad to backing plate so that pad is centered on backing plate
- Apply 12-16 pea size drops of polish somewhat evenly spaced on face of polishing pad
- Set polisher to a speed setting of 4
- With both hands, place polisher face onto panel of car
- Turn polisher on while maintaining control of polisher
- Apply enough pressure to maintain control, as well as downward force so the abrasives in the polish can actually perform the polishing
- Visually section off a 2' x 2' square section of your car to be the initial area of removing swirl marks and scratches in your car paint
- Move polisher while it is running back and forth from left to right until the entire 2' x 2' section has been polished, then switch to an up and down pattern while machine continues to run until you have polished the entire 2' x2' section again (this means that each area within this section will have been officially polished twice since you have overlapped the entire 2' x 2' section using up and down, and left to right movements all while the polisher remains on)
- Once you have finished this 2' x 2' section, use one of your brand new micro-fiber cloths to wipe polish off
- Check your results in both natural, direct sunlight as well as an artificial light source such as a hand held LED light
- Decide if additional polishing will be required based on your expectations and the results you are attempting to achieve
- As a basic rule, I use the pad cleaning brush to remove spent polish after every second application of polish (you don't have to go crazy with this part as you are simply releasing the majority of spent polish, and not trying make your pad perfectly clean each time)
Darren's Note: This is the part where I come in and help you to manage your expectations. Regardless of the polish, buffing pad, or buffer you choose, not every paint defect, blemish, or scratch will be capable of being polished away, or that you would necessarily want to polish away.
If you accept that you are "micro-scratching" your way to success, then you need to realize that the more you polish in trying to remove swirl marks and scratches, the progressively thinner your clear coat will become.
Clear coat thickness is a great thing and you will want to retain as much of the original thickness as possible. But like every area of life, you will have to decide the winning balance of trade-off's.
In removing swirl marks and scratches from your car paint, you are trading the thickness of your clear coat (paint), for enhanced visual appearance by removing swirl marks and scratches.
For this reason you will not want to keep polishing your paint in the quest for truly flawless paint.
Often, swirl marks and scratches may prove so significant that your clear coat will be rendered completely gone through excessive polishing.
That is the trade-off only you can decide and your situation will be unique to any other persons situation. Not all scratches will be capable of being removed through polishing, and in most cases there will be scratches too deep for removal.
As a rule when a person asks about removing swirl marks and scratches, the kind of scratches they are referring to are micro-scratches that make up the entire paint finishes as compared to independent or isolated random scratches of the deeper kind.
In the business as detailers, these deeper scratches that are independent and isolated are referred to as random isolated deeper scratches (RIDS).
What I need to emphasize is that some scratches are simply too deep to be "corrected". Once again, some scratches are too deep to be safely polished away.
As a beginner it is important to apply what you might call appropriate expectations. What this means is that you should accept the following:
- You will never know for certain how thick the clear coat on your car is (unless you are willing to spends thousand of dollars on a very sophisticated digital measuring device, there is no way to know unless you were willing to destroy a section of your clear coat to measure)
- Not all scratches are created equally (some are hairline, some a deep and wide gouges, some are deep at one end and shallow at the other end - anything goes)
- Some scratches are too deep to remove
- Scratches that can be removed should perhaps not be removed entirely do to thinning out the clear coat too much
- Some clear coats are harder than others and will require more work to produce results (Despite the chatter from non-professionals, it is incorrect to label a specific ca manufacturer or country as always having either soft or hard clears)
Removing Swirl Marks and Scratches Summary
If you have made it this far down this age, you deserve a medal of tenacity and determination. Clearly you stand as the fringe of a "drive-by society" that has very little discipline required for deeper understanding of knowledge.
I may have destabilized your current thinking on this somewhat complex subject. By all means use my contact form to let me know of your thoughts on anything contained on this page.
I always welcome opposing opinions as this helps me continue to develop my own skills and knowledge.
I wish you much success in your detailing efforts!
Sincerely,
Darren Priest
- Home
- Scratches and Chips
|
|


